The SAP Patch Manager (SPAM) is the customer side of the Online Correction Support (OCS). Transaction SPAM lets you efficiently and easily imports SAP-provided support packages into your system.
Depending on the system used or the configuration of your system, you must apply different types of support packages. You can get the support packages in the SAPNet R/3 FrontEnd, the SAPNet Web FrontEnd, or on Collection CDs.
SPAM runs at the SAP transaction level, so that knowledge of the operating system is not required for handling the tool.
SAP now uses the term support package instead of patch.
Note that you can only use this transaction with SAP GUI for Java and SAP GUI for Windows.
The SAP Patch Manager offers you the following functions:
| 1. |
Loading Support Packages |
|
You can load the Support Packages you need from the SAPNet Web FrontEnd, the SAPNet R/3 FrontEnd, or from Collection CDs into your system. |
| 2. |
Importing Support Packages |
|
a. Restart capability |
|
When you import a support package into your system, SPAM follows a predefined sequence of steps. |
|
If the support package process terminates, it can be resumed at a later point in time. Processing restarts at the step that failed. |
|
b. Displaying the import status in your system |
You can find the import status in your system at any time using transaction SPAM. Transaction SPAM is integrated into the SAP upgrade procedure.
The SAP Patch Manager informs you of the status of the step currently being executed in the status bar. If you want to know which steps are executed for which scenario, run the program RSSPAM10.
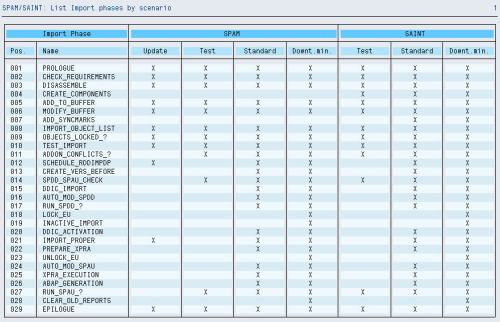
The following list explains the steps executed by SPAM in the order in which they are performed.
PROLOGUE
In this step, the system checks if you are authorized to import support packages.
CHECK_REQUIREMENTS
In this step, various requirements are checked for importing a support package, for example, the transport control program tp logging on to your system.
DISASSEMBLE
In this step, files from the corresponding EPS parcels are disassembled, or unpacked, and stored in the directory.
ADDTOBUFFER
In this step, the queue is put into the transport buffer of your system.
TEST_IMPORT
In this step, the system checks if there are still objects in tasks that have not yet been released and are overwritten when the support package is imported.
IMPORT_OBJECT_LIST
In this step, the object lists for the support packages in the queue are imported into the system.
OBJECTS_LOCKED_?
In this step, the system checks if there are still objects in tasks that have not yet been released and are overwritten when the support package is imported.
SCHEDULE_RDDIMPDP
In this step, the transport daemon (program RDDIMPDP) is scheduled.
ADDON_CONFLICTS_?
In this step, the system checks if there are conflicts between objects in the queue and installed addons.
SPDD_SPAU_CHECK
In this step, the system checks if a modification adjustment is necessary (transactions SPDD/SPAU).
DDIC_IMPORT
In this step, all the ABAP Dictionary objects of the queue are imported.
AUTO_MOD_SPDD
In this step, the system checks if modifications to the ABAP Dictionary objects can be adjusted automatically.
RUN_SPDD_?
In this step, you are asked to adjust your modifications to the ABAP Dictionary objects by calling transaction SPDD.
IMPORT_PROPER
In this step, all the Repository objects and table entries are imported. Then actions such as distribution, conversion, activation and generation occur.
AUTO_MOD_SPAU
In this step, the system checks if modifications can be adjusted automatically.
RUN_SPAU_?
In this step, you are asked to adjust your modifications to the repository objects by calling transaction SPAU.
EPILOGUE
In this step, the import of the support package is ended. The system checks if the queue has been completely processed.